"To be an artist is to believe in life."
Henry Moore
Still Life is the best subject in art for learning and teaching the skills of drawing and painting.
It teaches you how to look at objects and see them like an artist - with a perceptive awareness of their outline, shape, proportions, tone, color, texture, form and composition - all of which are completely necessary.
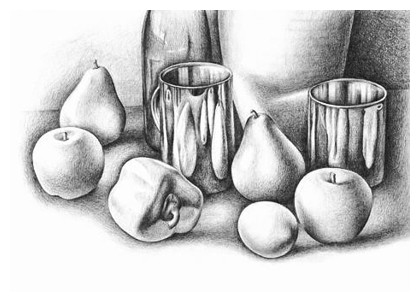
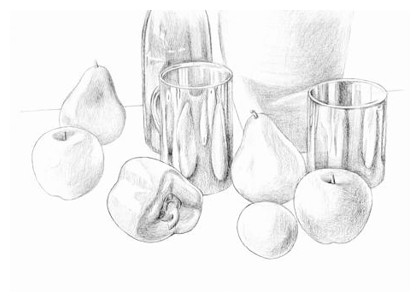
This step by step still life lesson will teach you the drawing techniques used to create the still life above which was done with a 2B pencil on cartridge paper.
It teaches you how to look at objects and see them like an artist - with a perceptive awareness of their outline, shape, proportions, tone, color, texture, form and composition - all of which are completely necessary.
This step by step still life lesson will teach you the drawing techniques used to create the still life above which was done with a 2B pencil on cartridge paper.
Art Materials Needed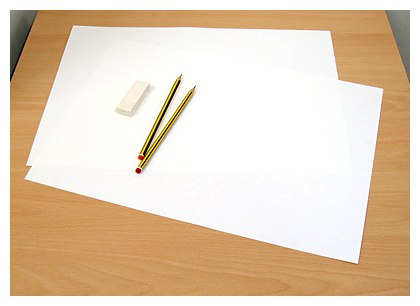
|
For this still life lesson you will need:
|

STEP 1: STARTING THE STILL LIFE DRAWING

|
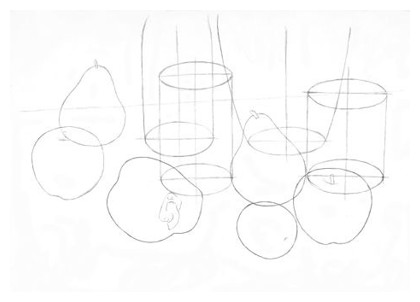
TECHNIQUE In any still life, you should start to draw the objects as if they are transparent wire frame forms with visible lines of construction. This technique helps you to be fully aware of the shape of each individual form and its position in relation to the other forms. It is important to sketch the objects lightly as this makes it easier to change any mistakes and erase any lines of construction. NOTE This see-through drawing technique uses vertical and horizontal lines of construction to help you to draw convincing ellipses and to balance the symmetry of cylindrical forms. |
STEP 2: CREATING AN INTERESTING COMPOSITION
|
TECHNIQUE When composing a still life, try to introduce the qualities that make an interesting arrangement. You need to be aware of the abstract structure of your arrangement: its rhythms and contrasts of line, shape, tone, color, pattern, texture and form. NOTE A transparent wire frame approach to sketching the still life helps you to organize the composition of the group. It makes it easier to see the shape, position and proportions of each object in relation to its neighbours. |
STEP 3: ERASING THE LINES OF CONSTRUCTION

|
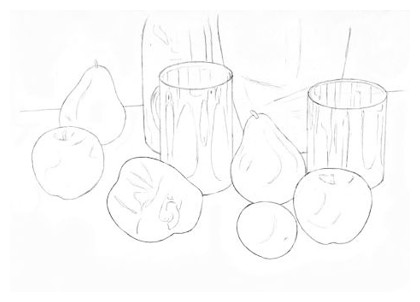
TECHNIQUE Once you are happy with the shape, proportion and composition of the still life, you can erase the lines of transparent construction. This will leave you with an accurate visible outline of each form and the confidence that all the objects are positioned correctly. You are now ready to work on the details of each object. |
STEP 4: ADDING THE DETAILS IN LINE
|
TECHNIQUE Now lightly sketch in the shapes of any shadows or reflections onto each object. NOTE The more care you take over the accuracy of these marks, the easier you will find the next stage of the drawing - the Application of Tone. |
STEP 5: SHADING TECHNIQUE - 1
|
TECHNIQUE The tone of our still life is built up in four stages outlined in steps 5 - 8. In this step, some basic tones are lightly applied to each object to help build up its three dimensional form. |
STEP 6: SHADING TECHNIQUE - 2

|
TECHNIQUE The second stage in building up the tone focuses on the spaces between and around the objects. NOTE The drawing of the light and shade between the objects must be treated with as much importance as the drawing of the objects themselves. The shadows cast beneath and around the objects add as much to the definition of their shapes as does the shading on their surfaces. Notice how the counter-change of tones between the objects and the spaces takes over from the use of line to define the forms of the still life. |
STEP 7: SHADING TECHNIQUE - 3
|
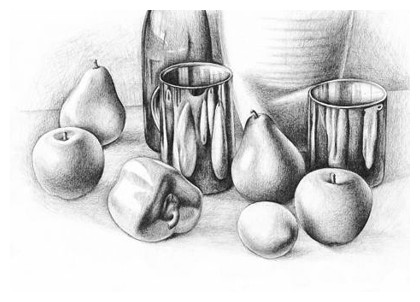
TECHNIQUE In the third stage of building up the tone, you focus back on the objects. This time you deepen their tone, increasing the contrast between the areas of dark and light. This will enhance the form of the objects and increase the impact of the image. NOTE The biggest problem at this stage is maintaining a balance of tones across the whole still life so that no object appears too dark or too light. You are searching for a unity of tone and form. |
STEP 8: SHADING TECHNIQUE - 4

|
TECHNIQUE Finally, you focus again on the spaces between the objects, deepening their tones and increasing their contrast. NOTE You need to be careful in balancing the tonal values of the objects and the spaces between them to ensure that you create a unified image. |
